This release note provides information on the latest version of ATI's Multimedia Center™ (MMC). The ATI Multimedia Center™ is updated to version 9.08. This version of the MMC has been further enhanced for improved stability, and performance.
The ATI Multimedia Center™ provides information on the following:
- ATI Multimedia Center™ 9.08 System Requirements
- New Features
- Resolved Issues with the ATI Multimedia Center™
- Known Issues with the ATI Multimedia Center™
- Using EazyShare™ for the First Time
- Configuring EazyShare™ on Client PCs with an ATI All-in-Wonder™
- Using the Media Library and File Player to remotely play VCR files
- Using EazyShare™ to Record Video
- Configuring EazyShare™ on Windows XP SP2 Systems
- Using the ATI Multimedia Center™ on Windows Media Center Edition
- Troubleshooting ATI's EazyShare™
- Direct Memory Access Settings
- Known issues with DVD Playback
- Known issues with TV
- Using EazyLook™
- Using the USB Remote Control
ATI Multimedia Center™ 9.08 System Requirements
This section provides information on the system requirements for successful installation and operation of the ATI Multimedia Center™ 9.08. The following is a list of system requirements for successful installation of the ATI Multimedia Center™ 9.08:
- Sound Card with DirectSound drivers
- Motherboard with AGP or PCI bus slot
- USB Port (for the Remote Wonder™ control)
- PIII 500, AMD Athlon 500 or better recommended
- 128 MB of memory recommended
- Windows 2000 or Windows XP
- DirectX 9.0 or later
- Remote Wonder version 2.2 or later is required for EazyLook™

Note: ATI All-in-Wonder™ products must be installed as the primary display adapter under the Windows operating system. This however, does not pertain to ATI TV Tuner products such as, the ATI TV Wonder™ series or the ATI HDTV Wonder™.
Note: Windows NT, Windows 98/98SE and Millennium Edition are not supported.
Note: The Terminal Services must be disabled in Windows 2000 Advanced Server.

Caution: You must uninstall any previous version of ATI Multimedia Center™ before installing this version.
New Features
The latest version of the ATI Multimedia Center™ introduces a new Audio Format option. The Preserve Best Audio Quality option is now the default setting and the recorded file uses the same audio format as the source.
Resolved Issues with the ATI Multimedia Center™
The following section provides information on resolved issues with this release of the ATI Multimedia Center™. These include the following:
- Attempting to export a timeshift file and playing it back using the file player or WMV no longer results in the video portion of the file failing to playback
- Using the remote to start a DTV session on the secondary display device no longer results in the session failing to respond after approximately 20 minutes
- Playing a vcr file prior to the playback of an MPEG 1 or 2 file no longer results in the video portion of the MPEG 1 or 2 file failing to be displayed when using the file player
- Attempting to playback a recorded AVI file when using a third party graphic adapter no longer results in only the audio being heard
- Playing an MPEG 1 or 2 file using the file player or Windows Media Player under Windows 2000 Traditional Chinese no longer results in hesitation being noticed
- Creating a new AVI setting and attempting to record with that setting no longer results in the operating system failing to respond
- Clicking the One touch settings button and selecting the file name option End of Recording, no longer results in an Rmanager dialog box being displayed stating incorrect settings, when clicking the record button
- The teletext button is no longer missing in the TV control panel for PAL systems
- Creating timeshift files using the remote control no longer results in the TV-On-Demand files playing back one frame before stopping
Known Issues with the ATI Multimedia Center™
The following section provides information on known issues and product limitation for the ATI Multimedia Center™ 9.08. These include the following:
- Launching a DTV application on a system with less than 100mb of free space may result in a blank screen being displayed when streaming video. Topic number 737-19381
- The Export Wizard dialog box found in the Media Library is currently not localized for the French and Spanish versions of Windows. Topic number 737-19382
- Queuing a movie file and an MP3 file in this order in the play list results in the file player failing to respond when selecting to switch to the next file (MP3). Topic number 737-19384
- Each click of the Channel Lockout button currently results in password dialog boxes being displayed for each click of the button. Topic number 737-19385
- Using the keyboard or mouse to select the channel surf button currently results in the channel surf grid appearing for a few seconds and then disappearing as normal TV resumes. Topic number 737-19387
- Clicking the ATI icon while playing a slide-show and selecting About, currently results in slide-show files failing to respond. Topic number 737-19388
- Video hesitation is noticed when playing DVD and having ATI RAGE Pass Thru audio enabled. Topic number 737-19389
- The Custom Preset dialog is currently not localized for the Spanish edition of Windows. Topic number 737-19390
- Attempting to use shortcut keys or predefined settings to resize the playback screen currently results in the playback screen failing to resize. 737-19391
Using EazyShare™ for the First Time
When using EazyShare™ for the first time, it is recommended that you ensure your network is configured correctly and that all computers connected to the network can communicate with each other.
For the server computer, the following is recommended:
- Start the ATI TV application and run through the initialization wizard.
Caution: When the Typical Audio Connections window is displayed, ensure that you have selected the option: I have connected the cable.
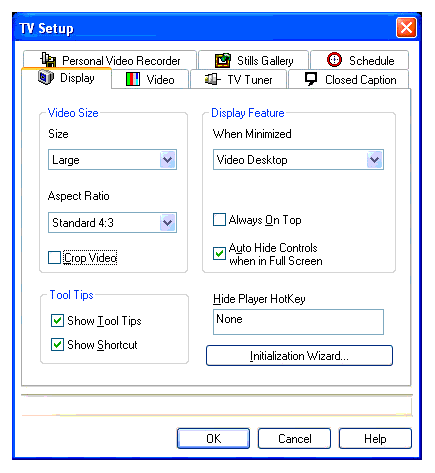
- Go to the TV Setup->Display tab, and uncheck the Crop Video option.
- If using the GemStar TVGuide+, you may need to update the TV Guide channel information. To update the GemStar TV Guide+, launch the application and following the on screen instructions.
Configuring EazyShare™ on Client PCs with an ATI All-in-Wonder™
This section provides information on how to successfully install the ATI MMC and configure the EazyShare™ software when a client PC contains an ATI All-in-Wonder™ product. To do this, follow these steps:
- Follow the instruction as listed above.
- When the method of installation window is displayed, click Custom: For advanced users and system administrators. Then the Choose the components Setup will install dialog box is displayed.
- Click Next. The installation of the EazyShare™ software driver is started. The Select Features window is displayed.
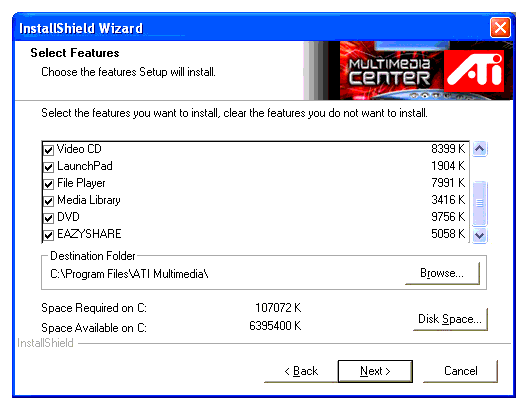
- Ensure EazyShare™ is selected and click Next. The Select Features, options you want to install window is displayed.
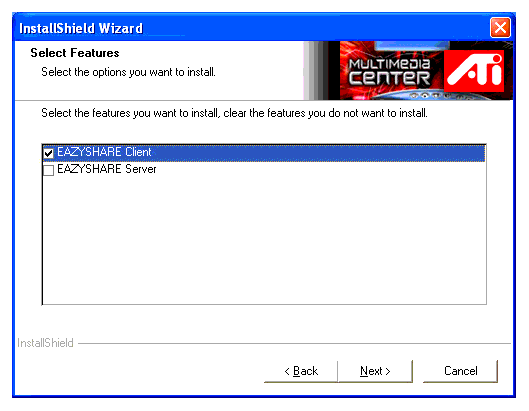
- Select EazyShare™ Client, and click Next. The Setup Complete window is displayed.
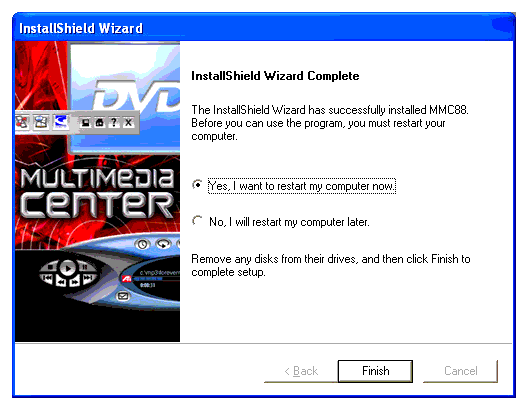
- Click Finish to restart your system and complete the installation of the ATI Multimedia Center™ and EazyShare™ software.
You have successfully installed the ATI Multimedia Center™ and configured the EazyShare™ software.
Using the Media Library and File Player to remotely play VCR files
This section provides information on using the Media Library and the File Player to remotely play VCR files.
To stream VCR files over the network, ATI recommends the following:
- Configure the Server PC to share the folder containing the media files
- On the client PCs, map a network drive to the folder on the server that contains the media files
- Start the Media Library and allow it to scan for content, including the mapped network drive. The media files on the server are then added to the library as regular (not EazyShare™) content. These files can then be played back simultaneously using EazyShare™ TV.
Using EazyShare™ to Record Video
When recording video using EazyShare™ ATI recommends that you go to the TV Setup->Display tab, and uncheck the Crop Video option. This will provide for improved stability when recording video.
Note: The Crop Video option cannot be disabled if TV ON DEMAND is enabled
Configuring EazyShare™ on Windows XP SP2 Systems
This section provides information on how to successfully configure EazyShare™ on Windows XP with Service Pack 2 installed.
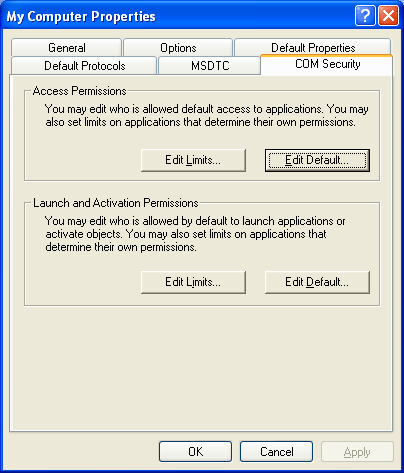
Both the COM Security and Firewall Exceptions for the server and client systems need to be configured under Windows XP SP2 in order to successfully use EazyShare™. To configure the COM Security, follow these steps:
- Click Start->Run, and enter dcomcnfg in the dialog box. Click OK. The component Services dialog box is displayed.
- Double-click Component Services, and navigate to My Computer.

- Right-click My Computer, and select Properties.
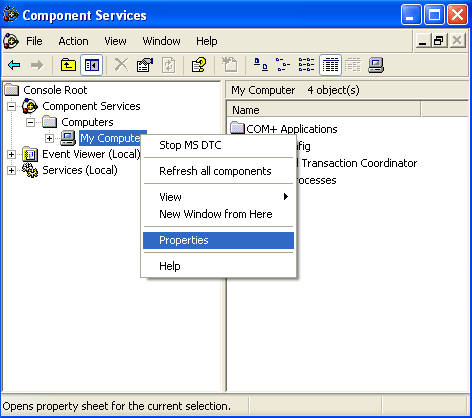
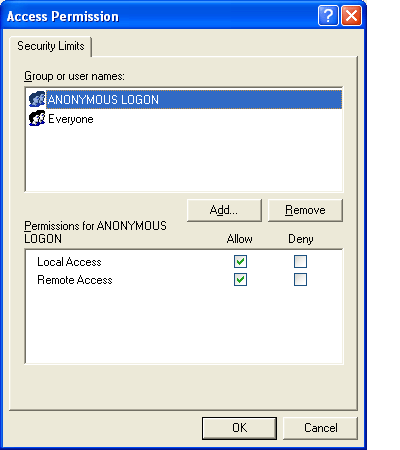
- Under the Permissions for both ANONYMOUS LOGON and Everyone, enable Remote Access and click OK. You are returned to the My Computer Properties.
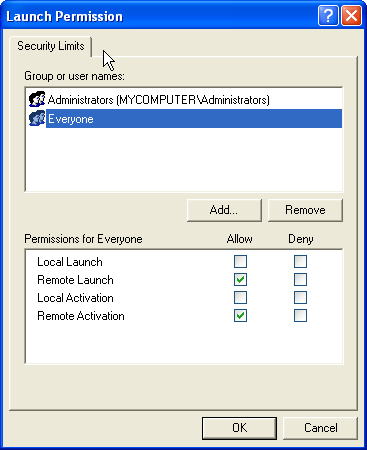
- Click Edit Limits... found under Launch and Activation Permissions.
- Under the Permissions for Everyone, enable Remote Launch and Remote Activation. Click OK, you are returned to the My Computer Properties.
- Click OK to close the My Computer Properties dialog box, and close the remaining dialog boxes. You are returned to the Windows Desktop.
You have successfully configured the COM Security for Windows XP SP2.
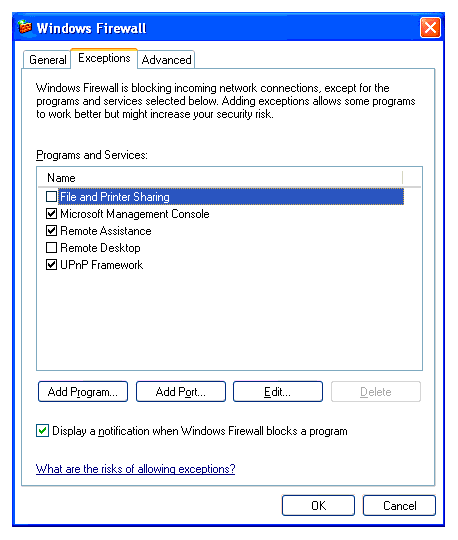
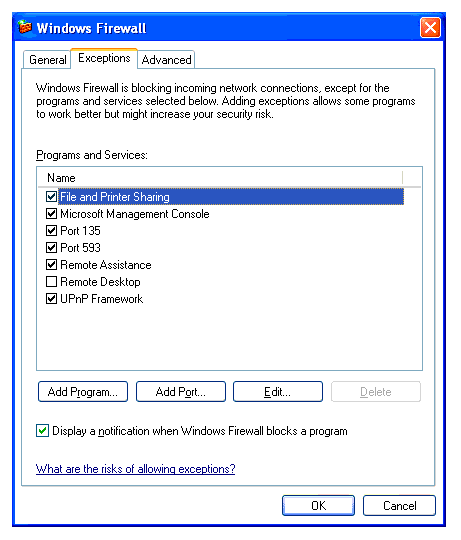
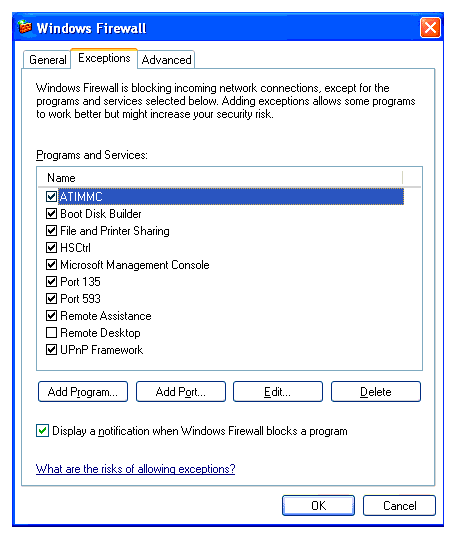
To configure the Firewall exceptions, both the Add Port and Add Program options must be configured. To add a port, follow these steps:
- Navigate to the Exceptions tab, and click the Add Port... button.
The Add a Port dialog box is displayed.
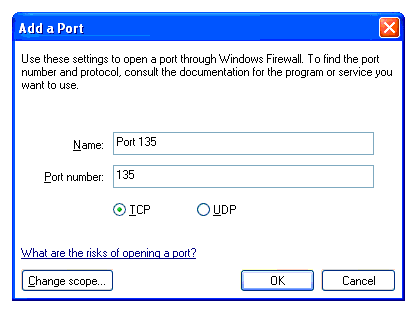
- Enter the name Port 135 for TCP.
- Enter the numeric port number 135.
- Click OK. You are returned to the Windows Firewall dialog box.
- Click the Add Port button. The Add a Port dialog box is displayed.
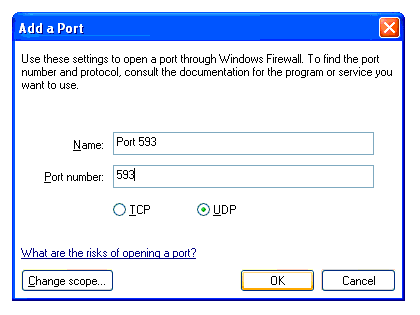
- Enter the name Port 593 for the UDP
- Enter the numeric port number 593
- Click OK.
You have successfully configured the ports required for the Firewall Exception.
To configure the Add Programs, follow these steps:
If any of the above cannot be found within the Program and Services, then they must be added.
- To add a program, click the Add Program... button. The Add a Program dialog box is displayed.
- Click the browse button and navigate to the following directories.
- Click OK. You are returned to the Add a Program dialog box.
- Click OK. You are returned to the Control Panel.
You have successfully configured the Programs and Services for the Windows Firewall exceptions.
Using the ATI Multimedia Center™ on Windows Media Center Edition
To use the ATI Multimedia Center™ on Microsoft's Windows Media Center Edition, follow these steps:
- Right-click on the Windows Taskbar and select Task Manager from the pop-up menu.
- Select Processes tab from Windows Task Manager
- Find and select ehRecvr process
- Click "End Process" button to terminate the process.
- Launch MMC TV application.
Note: These steps are not needed to start the ATI Multimedia Center™ DTV feature.
Troubleshooting ATI's EazyShare™
This section provides information on troubleshooting the EazyShare™ application.
- Not all clients are being seen
- Run the Configuration utility on the server. Ensure the Allow All Clients radio button is selected, or if the current setting is Per Client, ensure the problematic Clients are listed and allowed (Green check mark). You may want to temporarily select Per Client to ensure the server can communicate with the clients.
- The server name is empty
- Run Configuration utility on the Client. Ensure the correct server name is displayed. If server name is empty, click the Scan Network button
- Clients cannot connect
- If the Server's TV Setup dialog is being displayed, the clients cannot connect. Close the setup dialog box.
- If the Server is in EazyLook™ mode, the clients cannot connect. Ensure the ATI TV Player is either in a windowed mode or full screen mode on the server.
- The History file is corrupted
- If the client computer loses connection to the server, an EazyShare™ file, named ATI-HSTShift.his may become corrupted. In this event, ATI recommends that you delete this file. The file is located in a hidden folder. Go to the EazyShare™ TV Setup page, click on the TV-On-Demand tab locate the Drive to use for Temporary File. Ensure to enable search for hidden files and folders and delete the ATI-HSTShift.his file.
Direct Memory Access Settings
Direct Memory Access (DMA) is essential for smooth DVD playback. It is also essential for the correct behavior of TV-on-Demand. During installation of the ATI Multimedia Center™ 9.08, a hardware check of the DMA setting is made and a warning issued if the DMA is not enabled. The following section provides information on setting the DMA option.
Setting the DMA Option Under Windows 2000 and Windows XP
To enable the DMA option under Windows 2000 and Windows XP, follow these steps:
- Click Start->Settings->Control Panel. The Control Panel dialog box is displayed.
- Double-click System. The System Properties is displayed.
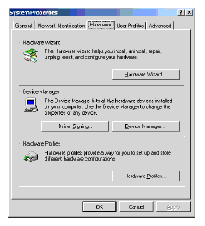
- Select the Hardware tab.
- Click the Device Manager button. The Device Manager dialog box is displayed.
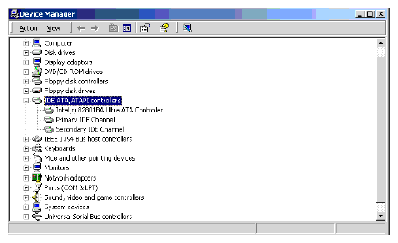
- Double-click the IDE ATA/ATAPI controllers.
- For both the Primary IDE Channel and the Secondary IDE Channel, double- click on the device to display its respective properties.
- Select the Advanced Settings tab.
Note: The Advanced Settings tab may not appear for all IDE controller devices.
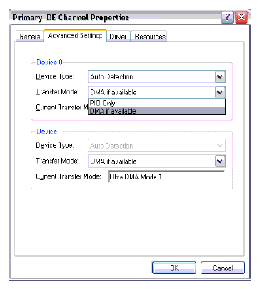
- Ensure the Current Transfer mode is not set to PIO only. If necessary, change the setting to DMA if available.
- Apply the changes and re-start Windows.
You have successfully enabled the DMA setting.
Color Depth and Resolution Switching
Changing the color depth or display resolution while the ATI Multimedia Center™ is running may result in an operating system or ATI Multimedia Center™ failure. ATI recommends you exit the ATI Multimedia Center™ before changing the resolution, color depth, or switching to a full screen DOS session.
Recording from a Source Encoded with Analog Copy Protection
The ATI All-in-Wonder™ products detect analog copy protection on the input source and will refuse to capture video from such sources. The record button automatically becomes disabled. Further, TV-on-Demand is not possible with an analog copy protected source.
TV Magazine and HTML Files
When using the TV Magazine feature, if you save to an .html file, note that still captures are saved in the same directory where the .html file is located. Each still capture is saved as a separate .jpg file. This is the correct behavior for HTML documents.
Video CD Playback
Certain older Video CD 2.0 discs contain authoring problems, which prevent them from working under Windows 2000 and Windows XP.
Still Capture and the File Player
Still capture is not supported for all formats that can be played through the File Player. For these formats the still capture button is does not function.
Extended Desktop and the File Player
Playback on the secondary monitor is not supported for all formats when extended desktop is enabled.
Corrupted Database with Gemstar Guide Plus+
While ATI and Gemstar closely monitor the TV Listings data, on rare occasions corrupted data may make the TV Guide software fail to startup. If this occurs, follow these steps:
- Go to the Add/Remove Programs.
- Select Gemstar GUIDE Plus+.
- Click on Add/Remove programs.
- When the dialog appears select Repair.
This will repair the broken database. The next time you run GUIDE Plus+ you will be asked to re-enter your name, E-mail and ZIP/Postal code.
For more information, go to: http://www.ati.com/support/faq/guideplusfaq.html.
Known issues with DVD Playback
This section provides information on known issues with the DVD Playback. This includes the following:
Color Depth Requirements
Playing DVDs in 8 bits per pixel (256 color mode) may result in choppy playback.
Jittery DVD Playback
On certain DVD video content you may experience sporadic jittery playback. You may also experience this while opening other windows or applications while DVD is playing. Make certain that you have the latest chipset drivers for your system to ensure optimal playback, and ensure that you have DMA enabled.
Screen Savers
The ATI DVD player cannot disable certain windows screen savers. OpenGL screen savers should not be activated during DVD playback. Disable any system screen savers before running DVD.
DVD and Component Video
When playing DVD titles on Component Video in 480P mode, the image will not be correctly centered. This issue will be addressed by a future ATI Display driver update.
Known issues with TV
This section provides information on known issues with TV. This includes the following:
Consecutively Scheduled Events
If you schedule two or more recording events that are consecutive in time, the second event may not start, as the previous event has not completed saving the recording to your HD. To avoid this, make the temporary capture drive the same drive as where you have designated the scheduled event to save to, or from the scheduler in the player, adjust the time of the second event to be 1 or 2 minutes after the first event.
Microsoft MS Messenger
Microsoft's MS Messenger cannot currently capture video from the ATI All-in-Wonder™ cards. Under Windows XP Microsoft has published an update to address this issue at: http://support.microsoft.com/support/kb/articles/q310/5/07.asp.
Using EazyLook™
This section provides information for using EazyLook™. This includes the following:
- Choosing EazyLook™ Options and Skins
- Enabling and Disabling EazyLook™
- EazyLook™ Permanent Indicators
- EazyLook™ and Multimonitor Environments
Choosing EazyLook™ Options and Skins
EazyLook™ includes 3 different skin colors, red, blue and green. The skin colors can be selected in the Skins tab of the ATI Multimedia Center™ Configuration Applet. In addition to the skin colors, there are a number of other EazyLook™ options that can be configured under the EazyLook™ tab of the Configuration Applet. To open the Configuration Applet either select Configuration under Start ->Program Files->ATI Multimedia, or click on the checkmark button in the ATI Multimedia Center™ LaunchPad.
Enabling and Disabling EazyLook™
There are several ways to enable EazyLook™ including:
- Any key on the remote (default)
- Full screen button on the remote (default)
- Full screen mode in the application
- Always use EazyLook™
Similarly EazyLook™ can be disabled by:
The default behavior is to enable EazyLook™ with any key on the remote and disable EazyLook™ by pressing the ESC key. These options may be changed in the EazyLook™ tab of the ATI Multimedia Center™ control panel.
EazyLook™ Permanent Indicators
EazyLook™ supports a strip of indicators in each feature that show permanent or sticky settings such as, Mute, CC, Looping, and more. These indicators are preeminently displayed in a strip down the right side of the display. Whether or not EazyLook™ displays these permanent indicators can be controlled in EazyLook™ tab of the Multimedia Control Panel. By default permanent indicators are enabled.
EazyLook™ and Multimonitor Environments
EazyLook™ can be used in a multimonitor environment, but EazyLook™ must be run on the primary display. To run EazyLook™ on your TV you must set the TV as the primary display device.
Note: EazyLook™ is not compatible with ATI's OVERLAY THEATER MODE
Using the USB Remote Control
This section provides information on using a USB Remote Control. This includes the following:
USB RECEIVER PLACEMENT
For optimum reception, the USB receiver should be placed as far from the case of your PC as possible. Do not place it close to your TV. Leaving the cover off the PC, or having the receiver in close proximity to other high frequency devices may effect the range and/or reliability of the remote. If you have a USB HUB, connecting the receiver to the hub may increase the performance of the remote control.
USB DEVICE CONFLICT
If the USB device is incorrectly installed, the receiver will be listed in the device manager as a non-working device. To resolve this try plugging the USB remote receiver into a different USB port to force Windows to re-detect the hardware, or if this doesn't work, follow these steps:
- Open the Control Panel.
- Select System.
- Click on the Device Manager tab.
- Select the USB Receiver. This will have a yellow exclamation mark on it.
- Select Remove.
- Select Refresh.
Note: After installing the USB remote, you must reboot Windows before the remote control can function properly.
Selection of Audio Configuration
When you first run the TV application in MMC, the Initialization Wizard is automatically run. On the sound initialization wizard page select Analog Mix. A second window will pop-up asking you to confirm which physical connector you have connected your ATI All-in-Wonder™ audio to. Usually this will be Auxiliary or Line In. Select the input that matches your physical connection and press OK.
Note: When switching between mono and stereo sound, or between stereo and mono sound, a slight popping sound maybe heard.
Using TV-On-Demand
If you are using the version 250 (or later) Audigy drivers and correctly configured the ATI Multimedia Center™ in the Initialization Wizard (as described above), the TV-on-Demand function should behave normally. If you do not configure the drivers correctly you will have no audio while using TV-on-Demand.
Using Video Capture
If you are using the version 250 (or later) Audigy drivers and correctly configured the ATI Multimedia Center™ in the Initialization Wizard as described above, then you will not be able to adjust the playback volume while you are recording. This occurs because the record and playback levels are linked and adjusting the playback volume will affect the record volume. You will be able to mute audio during recording (without affecting the recording).
MulTView™ and Audigy
If you are using the MulTView™ feature with an Audigy card, you will need to connect the ATI TV Wonder™ card audio to the Microphone input (MIC) on the Audigy card. You must also disable the +20dB gain setting on the microphone input. See your Audigy sound card manual for details on how to adjust the microphone inputs.
| ATI Technologies Inc. http://www.ati.com Voice: (905) 882-2600 Fax: (905) 882-2620 |